
In the beginning there was a snail operculum (that's door to us laypeople). And this shell wanted setting, because a client paid me to do so. However, I have never set an awkward shape or sheer size like this - asymetrical yes, but not where one side is twice as thick as the other side with a bulky bottom sticking out.
At 2.5 cm x 3.25 cm (1 in x 1.3 in), the shell will test my silversmithing skills. So I charged less to the client, as I typically do when a project will push my boundaries and give me a chance to learn new skills.
Please note:
This is not a how to on creating a bezel setting in silversmithing, more the journalling of my boundary pushing steps.
No settings below have been cleaned up. This is the deep and dirty of silversmithing.
 |
| Try #1 Back |
Bezel setting attempt #1
Materials:
3 mm tall 0.3 fine silver bezel strip
2 mm round silver wire as backplate
Hard solder
Lately, I have tried to scrimp on silver by using thick wire flattened as the base plate. This has worked well on the smaller (under 10 cm/0.4 in) stones I have set.
I also assumed a 3 mm bezel strip would be enough to trap the sides (both thick and thin) provided the back plate is thin enough to just catch the thicker side.
I have not soldered such a large expanse of silver before and use a mini torch on butane gas. I went through 2 full fills on the torch tank before I realised the silver was too big and the fire proof ceramic tile was sucking the heat away from the solder. Out came my broken charcoal block after remembering where I'd stashed it after a flash back to early lessons.
 |
| Try #1 at side |
Finally all of the solder had melted and the bezel was stuck down. I used a LOT of solder, too. All looked good until the last minute when the bezel seemed to do a slight readjustment movement. Didn't think about it though.
 |
| Offending base plate wire sticking up |
In the land of the well tooled I am sure there is a dremel attachment that would, with patience, grind it away, but I noticed that unless I completely shave away all of the backplate, the 3 mm strip was too short to catch the larger side.
Oh boy. Start again....
Try #2: The Ring
 |
| Flattened back plate |
5 mm fine silver Bezel strip
2 mm sterling silver round wire as base plate
Hard solder
planishing hammer
I made the bezel strip around the shell and set aside. Next the 2 mm round wire was made into a circle that fit exactly under the bezel strip.
In theory I hammer it flat slightly and the bezel strip should sit smoothly on top with a bit of lip inside and outside of the bezel wall to act as the back plate, as works for the small stones I have set in the past.
 |
| Too Big |
Note to self, there is such a thing as too much aggression therapy session on the hammer whacking away on the wire. My wire ring grew so much (with my planishing hammer) the inner diameter of the oval was bigger than the outer diameter of my bezel strip. Woops.
I did not even bother making a new one and went upstairs, calling it a day.
The bezel strip was left for a third try.
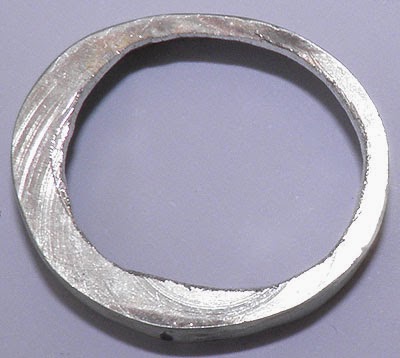
Try #3: The Almost Right
Materials:5 mm fine silver bezel strip (already prepared)
1 mm thick sterling silver sheet for backplate
hard solder
Third time is the charm, right? You would think so.
Going back to basics, going old school, doing it the right way from the start. Solder bezel to plate, cut plate out, cut middle out and done.
 |
| Try #3 Looking Good |
The prepared earlier bezel strip was soldered to a large plate of sterling silver sheet. I put the whole thing on top of the charcoal block and the solder melted beautifully to that mirror glint at the seam of strip/sheet. Normally, it is suggested to make the back plate as small as possible so to not heat up unnecessary. I did not remember this of course until after I looked at the expanse of silver that required removal.
I was so happy and full of glee! Everything working to plan. A few hours later, said tongue in cheek, the bezel setting was released from the rest of the sheet metal with my coping saw. Forgot how tough 1 mm silver sheet is!
 |
| Try #3: Sides cleaned up |
Took a while and kept forcing the wedge a little too tightly so it bent the bezel strip down quite a bit. But the outside looked beautiful sanded down with 280 grit sand paper when finished. I used pliers and other rounded objects to coax the bezel strip back into a good shape and it still fit the shell!
 |
| Try #3 Back |
The centre was punched lightly and the drill press put into use to make a hole in the centre of the back plate for my coping saw. I have decided I am not very fine tuned with this tool either (out of practice mostly) but I got a relatively even looking oval cut out which required MORE sawing for the back of the shell to stick through.
 |
| Try #3: Setting almost finished |
When the outside was filed away and the back plate hollowed out, there sat the perfect bezel setting for the shell. Just needed to file a little deeper in the back plate on one side.
 |
| Try #3: Cracked Bezel |
I tried to make the back plate shallower for where the thicker side sits, but it will not make the bezel sides even - even if I can get it to sit lower. And a bezel slightly taller on one side than the other will be noticeable.
Words cannot say the amount of frustration here!
Try #4: Hopeful Success
 |
| Try #4: Bezel Strip Soldered |
5 mm x 0.3 m Bezel Strip
0.5 mm sterling silver sheet
5 mm ID x 1 mm sterling silver tube (bail)
Hard solder
Easy Solder
A new bezel strip soldered was crafted - but at last minute the ends overlapped just as the hard solder flowed. Just kept moving forward. Carefully forming the strip around the shell again, the overlapping became a bonus because the ring fit perfectly.
Back on top of the charcoal brick, the bezel strip soldered beautifully onto the thinner (and pre-shaped) back plate within 1 torch tank worth of butane. Hard solder flowed to the mirror flash all around, ensuring a solid and firm attachment. At this point, I went upstairs calling it a day. Didn't want to test the luck too much!
 |
| Try #4: A light trim |
The filing took quite a while and a lot of elbow grease as I took it easy with a light touch. Using a small fine metal file, I removed the bulk of the lip and then moved down to a paddle pop stick wrapped with 280 grit sand paper to do the fine filing and remove previous file bite marks.
 |
| Try #4: Front Shot |
The shell was used in place to test and fine tune the back plate hole until the shell sat with a consistent 1 mm lip all around under bezel edge. Now time for the bail tube.
I used a right angle level to make sure the bit of tube I cut out was mostly square on both ends (and filed out a few skidding coping saw marks). Easy solder was sweat soldered to the middle of the tube and then centrered onto the top bezel strip seam for final soldering.
At last minute I decided to add just a smidgen more of easy solder on top of the join, just in case. The two pieces stuck together nicely with a bit of flux and the solder flowed beautifully. Glad to see things working right! Unsure if the bail is a little sideways, and really not fussed at this stage.
|
|


Pendant is pickling and still needs setting and final polish. But it is done!


1 comment:
Good on you for persisting. It looks wonderful
Post a Comment